DISCLAIMER: I AM NEITHER AN AUDIO TECHNICIAN, ENGINEER, NOR ‘PHILE. NONE OF THIS ADVICE IS MY “PROFESSIONAL” ANALYSIS, RECOMMENDATION, OR OPINION. I AM JUST A GUY WHO LIKES VINTAGE AUDIO GEAR BECAUSE IT CONJURES FEELINGS OF GREAT NOSTALGIA. WHAT FOLLOWS IS THINGS AND STUFF I’VE LEARNED IN THE 10 YEARS SINCE MY OLD MAN SURPRISED THE SHIT OUT OF ME BY GIVING ME—HOW DID HE STILL HAVE IT AFTER ALL THOSE YEARS???—HIS ORIGINAL PIONEER RECEIVER AND TURNTABLE. QUITE CLEARLY THERE ARE GAZILLIONS OF MORE AUDIO SAVVY (MOSTLY) DUDES LURKING IN EVERY CORNER OF THE AUDIOKARMA (AK) FORUMS. IF YOU WANT EXPERT—BORDERING ON SNOBBISH ELITIST—ADVICE, I VIGOROUSLY RECOMMEND YOU READ NO FURTHER AND GO THERE NOW!
YOU’VE BEEN WARNED…CONTINUE AT YOUR OWN PERIL…
Back when I was a young lad of 39 and had just become the steward of my father’s Pioneer SX-780 receiver, PL-400 turntable, and some random Technics cassette deck, which I promptly flipped, I was suddenly faced with a dilemma:
How do you hook dis shit up?!
Honestly, connecting a turntable to a receiver or amp is not rocket science (just don’t forget to hook up the ground wire). And the definitive YouTube vid on that process has been done 16,728 times. I won’t bore you with the details, but that’s why it’s missing from the forthcoming diagram to which I’ll allude a dozen more times before I actually plop the damn thing on this blog post. I have a pair of turntables: a Pioneer PL-630, and a PL-560 hooked up to my basement rig. When you (eventually) look at the diagram, those TTs are hooked up to PHONO1 (PL-630) and PHONO2 (PL-560) on the back of the SA-9800 integrated amplifier.
OK, back to my story. I went a bit bananas after my father shocked the hell out of me a decade ago. I figured he’d tossed out the stereo of my youth when he moved. I was 39 when he gave it to me. I had likely last listened to it when I was 10. It was a bit of a mind-blow to have him produce it and give it to me nearly 30 years down the road.
Since that fateful day, I’ve acquired a number of rigs and a condition known as “audiophilitis”. This malady causes the sufferer to continuously purchase, rotate, and sell various vintage audio components. Let me introduce the current line-up(s):
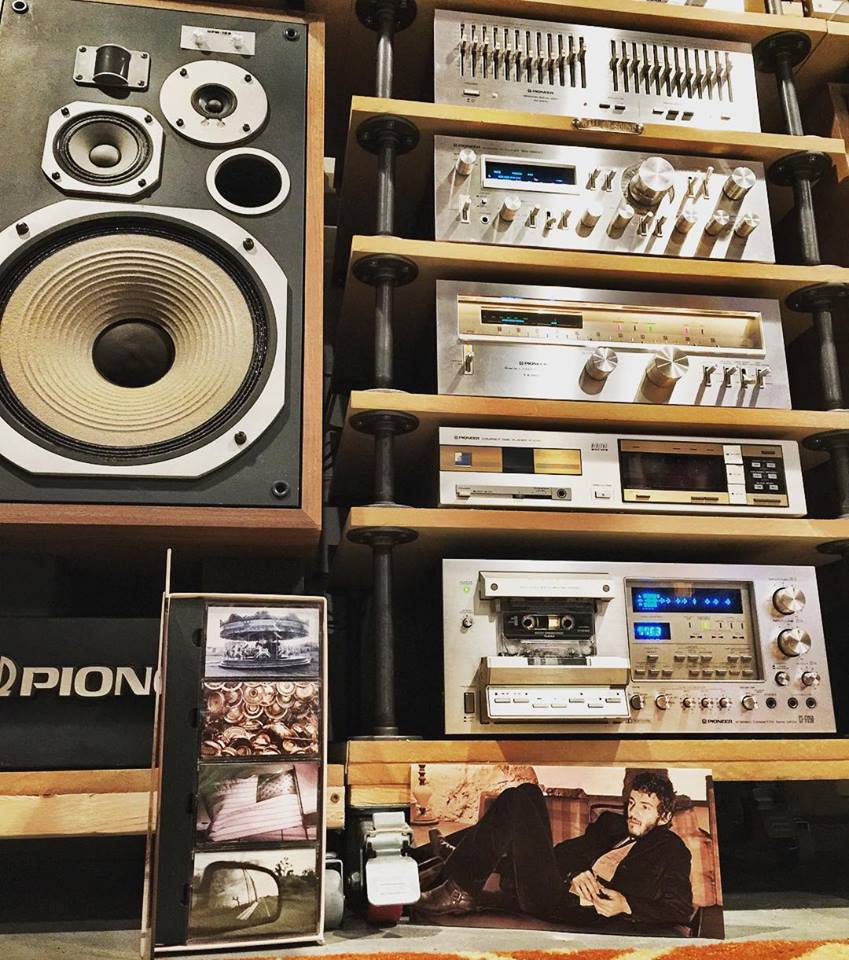
This is the one I’ve been assembling and reassembling for a decade. The task was a labor of endless love and countless dollars. It’s been in this state for just over two years with the acquisition of the pièce de ré·sis·tance, the crowning achievement: the RT-909. It features all of Pioneer’s top of the line (TOTL) fluoroscan units from the 1978-80 time period along with Pioneer’s TOTL turntable from that era: the PL-630.
The basement rig (a.k.a. “The Wall of Sound” or “The Altar“)…

Top to Bottom…
- Pioneer RT-909 Reel-To-Reel
- Pioneer DT-400 Digital Timer
- Pioneer RG-2 Dynamic Expander
- Pioneer PL-630 Turntable
- Pioneer SR-303 Reverb
- Pioneer PL-560 Turntable
- Pioneer SG-9800 12-Band Graphic Equalizer
- Pioneer SA-9800 Integrated Amplifier (100 WPC)
- Pioneer TX-9800 AM/FM Tuner
- Pioneer P-D70 CD Player
- Pioneer CT-F1250 Cassette Deck
- Pioneer HPM-100 Speakers (100W)
- Pioneer HPM-1500 Speakers (250W)
- Pioneer SE-305 Headphones
- Pioneer SE-2P Headphones
- Pioneer SE-L-20A Headphones
- Pioneer SE-L-40 Headphones
Then, there are the ancillary pieces right next door…

Top to Bottom…
- The “Little Bear” Bluetooth Receiver
- Pioneer U-24 Program Selector
- Pioneer TVX-9500 Stereo TV Tuner
- Pioneer RH-65 8-Track Tape Deck
Just last fall, I became aware of a wondrous thing called the Pioneer Progression IV system which came out just before Christmas 1985. It was Pioneer’s first foray into a “shelf stereo”. Because 13-year-old me would have thought he’d died and ascended if one of these was under the tree, I (obviously) had to track down all of the components.
The other basement rig (a.k.a. “The Teen Dream Machine“)…
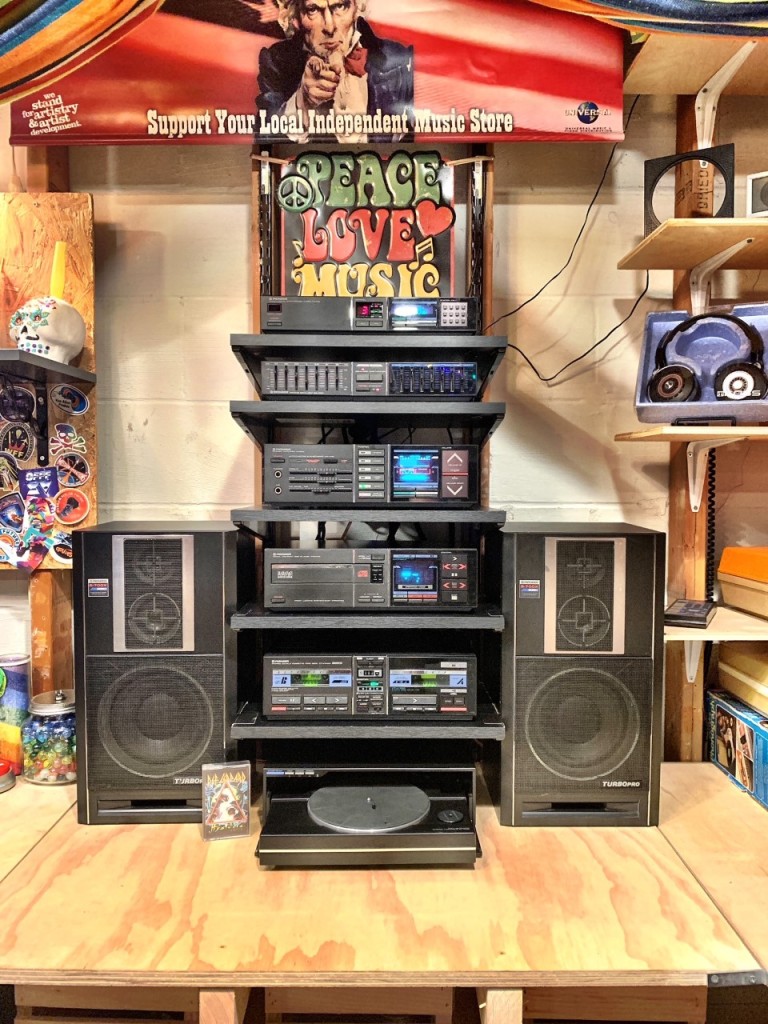
Top to bottom..
- Pioneer SG-X700 7-Band Graphic Equalizer
- Pioneer F-X700 AM/FM Tuner
- Pioneer A-X900 Amplifier (75 WPC)
- Pioneer P-DX700 CD Player
- Pioneer CT-X700W Dual Cassette Deck
- Pioneer PL-X300 Front-Load Turntable
- Pioneer S-700X Speakers (90W)
- Koss HV/1 Headphones
- PIONEER CU-X700 Remote Control
Because it’s too arduous to pull any of the other rigs in the house apart to test new components or troubleshoot “tricky” ones, I’ve assembled a makeshift audio workstation, which can be easily accessed from the area under the stairs. I wanted a Pioneer stack from my college era for this purpose. I now have one.
Another basement rig (a.k.a. “Da Blaque Plague“)…

Top to bottom…
- Pioneer RA-J5000 Compact Stereo Cabinet
- Pioneer PL-990 Turntable
- Pioneer GR-555 Graphic 7-Band Equalizer (coming soon)
- Pioneer VSX-453 AM/FM Receiver (100 WPC)
- Pioneer PD-F904 100-CD Jukebox
- Pioneer CT-W530R Dual Cassette Deck
- Pioneer HPM-40 Speakers (40W)
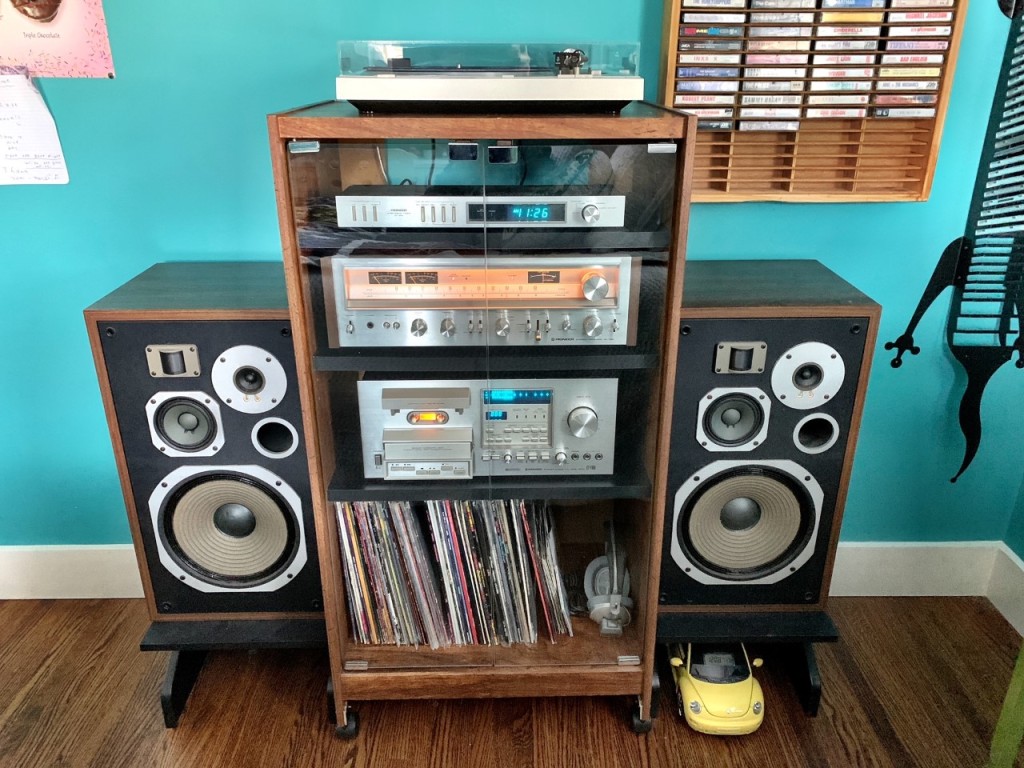
Then, there is the more classy main level rig for quiet dinners, rip-roaring cocktail parties, and everything in between. It took nearly four years to track down the dueling pairs of Pioneer CS-22A’s—the only Pioneer CS Series speakers that fit into the cabinet.
The main level rig (a.k.a. “Gatsby“)…

Top to bottom…
- Pioneer PL-530 Turntable
- Pioneer TX-7800 AM/FM Tuner
- Pioneer SA-7800 Amplifier (65 WPC)
- Pioneer CT-F1250 Cassette Deck
- CS-22A Speakers (2 sets 10-40W)
Then there’s the rig that started it all. By the time the old man gave me his stereo a decade back, I’d long since converted my entire (500) CD collection to MP3 and donated it to the public library. In those digital days, I didn’t have a record, cassette, or CD to my name—LOL!
My Daughter’s bedroom rig (a.k.a. “The Old Man’s Rig“)…
Top to bottom…
- Pioneer PL-400 Turntable
- Pioneer DT-400 Digital Timer
- Pioneer SX-780 AM/FM Receiver (45 WPC)
- Pioneer CT-F900 Cassette Deck
- Pioneer HPM-60 Speakers (60W)
- Pioneer SE-2P Headphones
Then there’s the garage rig (aka “Cooter“)…
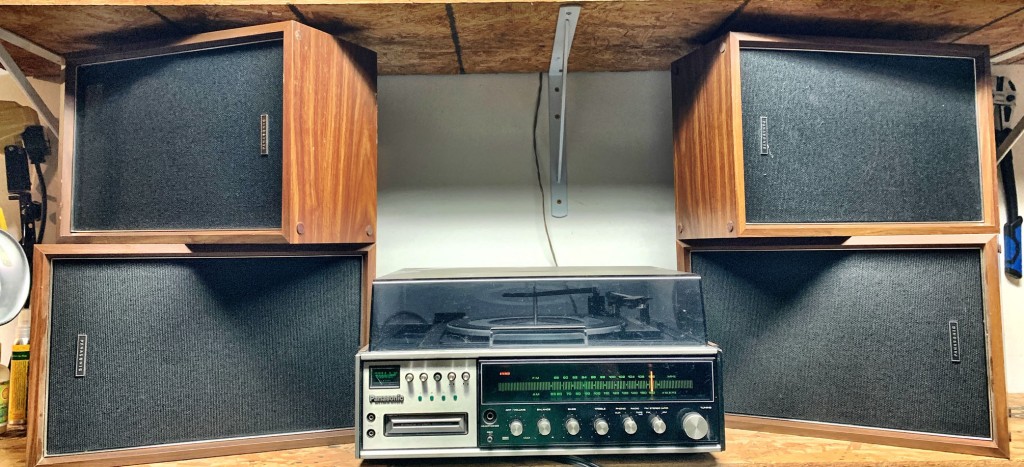
This is a Panasonic SE-3280 AM/FM Stereo Music Center (AM/FM, 8-Track, Turntable). Four matching Panasonic SB-207 Speakers (36W) pump out the sound for those long afternoons of pulling weeds or tearing apart components and cleaning pots with Deoxit on the workbench.
Anyway, those are my credentials. That’s all I got. So, take the following information/advice with a shitload of salt grains.
I often post photos of my stereo altars on my Instagram feed. I received a comment on my latest post from one @jjuniorrssobrall. Just as I once was, he was baffled as to how to hook up numerous “sound altering” components to an amp or receiver. He saw my photo and, as he has nearly the same setup, begged for help (in Spanish). Needless to say my three years of high school Spanish are buried too deeply in my subconscious—thank you Google Translate!
I truly felt his pain. I once asked this very same question on the AK Forums and was promptly referred to this thread, which apparently answers all questions, except it doesn’t. I was sent these two diagrams by one kindly soul. They are quite helpful, but are far from the complete wiring diagram for my ludicrous basement rig.
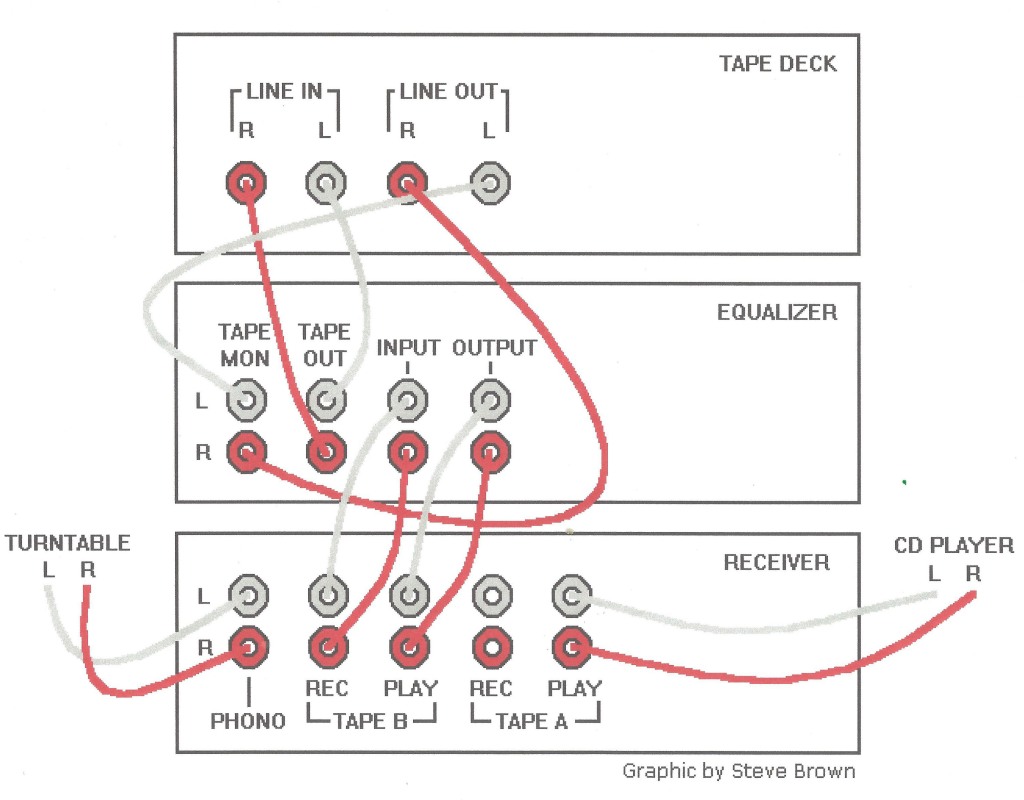
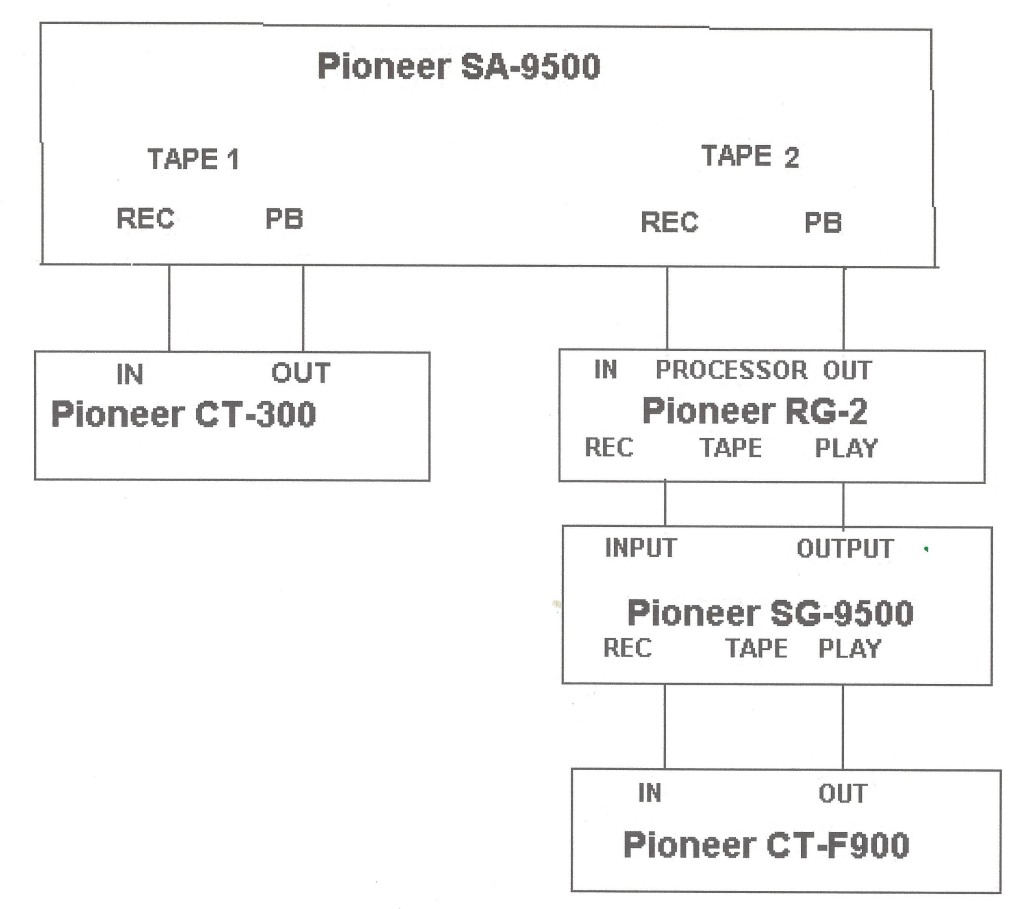
Essentially, this is the visual representation of what everyone was debating in the aforementioned AK Forum thread. I took the first approach. I call it the “sound loop”. Maybe others call it that as well. Some call it a “tape loop”. It’s a loop, regardless of what the hell you call it.
I sent these to @jjuniorrssobrall, and while he seemed appreciative (in Spanish), he begged me to provide detail of how I hooked up my main basement rig. He then sent me a photo of his stack, which was nearly identical to mine.
I thought about this. a lot. There is a line in the Lori KcKenna tune “Humble and Kind”—popularized by Tim McGraw—that goes like this:
Don’t take for granted the love this life gives you
Humble and Kind, Lori McKenna
When you get where you’re going don’t forget turn back around
And help the next one in line
Always stay humble and kind
I’ve been a fan of Lori’s for as long as I’ve had this hobby. My wife and I saw Lori at the Bluebird Cafe in Nashville on 10/13/2014 long before she was famous. We didn’t have advanced tickets, so we got there three hours early and drank beers from the service station a block away and waited. We were #7 & #8 in line. Needless to say, we got in!

At that time, she was just a traveling singer songwriter trying to sell a few tunes and make a little money. She closed the Bluebird show with “Humble and Kind”—it was her encore tune and not on the setlist. It was the first time I’d ever heard it, as it had never appeared on any of her albums at that point.
And that last verse it pretty heavy, poignant.
When I got a series of follow-up DMs from @jjuniorrssobrall desperate for assistance, and I remembered how desperate (and frustrated) I once was, I decided that doing a full schematic for my basement rig was my Karmatic duty.
Without further adieu, I present: How To Hook Up Pioneer a SA-9800 + RG-2 + SR-303 + SG-9800 + CT-F1250…

I can’t technically explain how this works, but it does. The “loop” utilizes the Tape 1 component—the CT-F1250 in my case—as a switch to turn on or off all of the sound altering components. This is done by simply pressing the Tape/Source (Monitor) button on the deck and appropriately flipping the Tape Monitor & Duplicate switches on the SA-9800. Obviously, you need a tape deck with a Monitor button for this to work.
Additionally, you can switch off each sound altering component separately on the component with the respective on/off switch. I’ll explain all that in detail, as it took me forever to get everything switched/dialed properly. The basement rig is truly teenager-proof, parent-proof, and spouse-proof. I’m the only one who can even turn the damn thing on—ha!
While the RT-909 is not theoretically part of the loop, it is part of the duplicate metering display process. In other words, if you engage the loop, and you want to watch the RT-909 meters bounce in time with all of the other meters, you have to do a couple of things. Hence, I’ll include it.
I won’t include the Tuner, CD Player, or the turntables. They are not part of the loop, and you don’t need to do anything with them specifically. I’ll describe three scenarios and how the components should look in each one.
Scenario #1 – Listening to the turntable, tuner, or AUX (CD player, in my case)…
SA-9800

On the amp, the only thing you need to do to engage the sound loop is to set the Tape Monitor switch to: 1 — by doing this, you are engaging whatever is plugged into the Tape 1 inputs on the rear of the amp, which in this case is our sound loop.
Setting the Tape Monitor switch to: Off disengages the sound loop, but allows the meters to keep bouncing along with the beat.
Switching the Tape Monitor switch between 1 and Off allows to you hear the impact of all of the sound altering components on whatever noise is emanating from your speakers.
Audiophile rule: Always set the Tape Monitor switch to: Off when listening to your turntable. Anyone who would dare alter the sound of a record is a neophytic barbarian noob and does not deserve to even hear records, at all, ever—dammit!
My rule: It’s your ear, it’s your gear, do whatever sounds good to you—I’m not here to judge.
CT-F1250
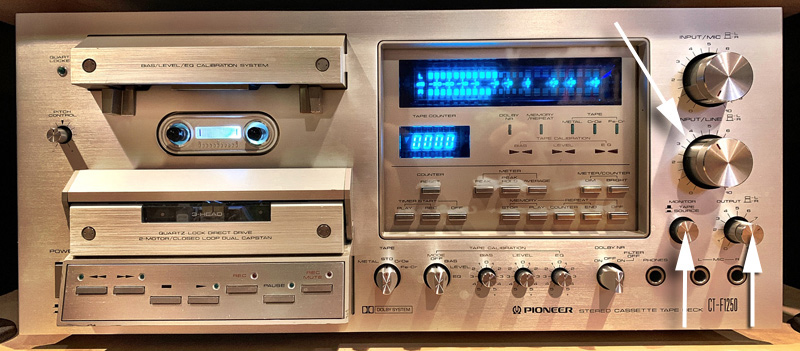
First off, the Monitor toggle button has two states: Tape and Source.
- Generally speaking, you want it toggled to Tape when, not surprisingly, you are listening to a cassette.
- Generally speaking, you want it toggled to Source all other times, including when you want to hear the sound loop.
Next, there are two important volume knobs: Input/Line and Output.
- The one labelled: Output controls the volume of the output of the deck when you have the Monitor button toggled to Tape.
- The one labelled: Input/Line controls the volume of the output of the deck when you have the Monitor button toggled to Source.
If you are listening to a cassette:
- Make sure the Monitor button toggled to Tape.
- Make sure the Output knob is not turned all the way down. I’m not going to discuss what it should be set at—it definitely should not be set at 0. It does default to 6—you’ll feel a sort of click at 6—but there are plenty of discussions about this in the AK forums. If you want to waste hours of your life, read through them. Don’t say I didn’t warn you.
If you are listening to…say…the tuner and want to hear the sound loop:
- Make sure the Monitor button toggled to Source.
- Make sure the Input/Line knob is not turned all the way down. I’m not going to discuss what it should be set at—it definitely should not be set at 0. Unlike the Output knob, it has no default, but there are plenty of discussions about this in the AK forums. If you want to waste hours of your life, read through them. Don’t say I didn’t warn you.
RG-2
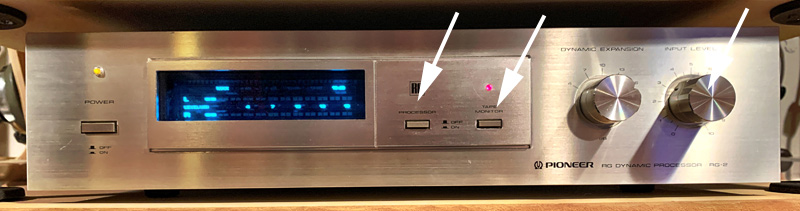
First off, the RG-2 needs to be on.
The Tape Monitor button has to be engaged (red light). On any of the sound altering components, toggling this button off will break the entire loop.
The Processor button can be toggled on or off depending on whether or not you want the RG-2 active in the loop. Toggling it off will not break the loop, it will simply take the RG-2 out of the loop.
The Input Level knob has to be set to something for the loop to function. Turning it all the way down will kill the loop. I generally set mine to 3.5, but you can experiment to your heart’s content.
SR-303
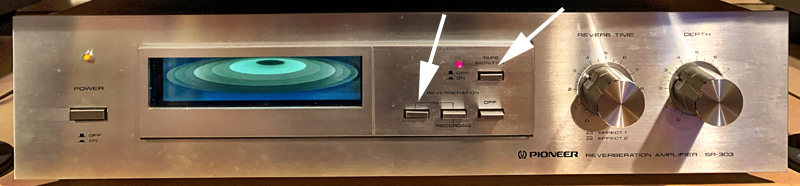
First off, the SR-303 needs to be on.
The Tape Monitor button has to be engaged (red light). On any of the sound altering components, toggling this button off will break the entire loop.
The Reverberation button can be toggled on or off depending on whether or not you want the SR-303 active in the loop. Toggling it off will not break the loop, it will simply take the SR-303 out of the loop. Sadly, it will also dim the super groovy cosmic display.
The Reverb Time and Depth knobs can be adjusted for maximum or minimum reverb. They also affect the super groovy cosmic display.
SG-9800

First off, the SG-9800 needs to be on.
The Tape Monitor button has to be engaged (red light). On any of the sound altering components, toggling this button off will break the entire loop.
The Equalizer button can be toggled on or off depending on whether or not you want the SG-9800 active in the loop. Toggling it off will not break the loop, it will simply take the SG-9800 out of the loop. Sadly, it will also dim the super groovy slider lights.
RT-909
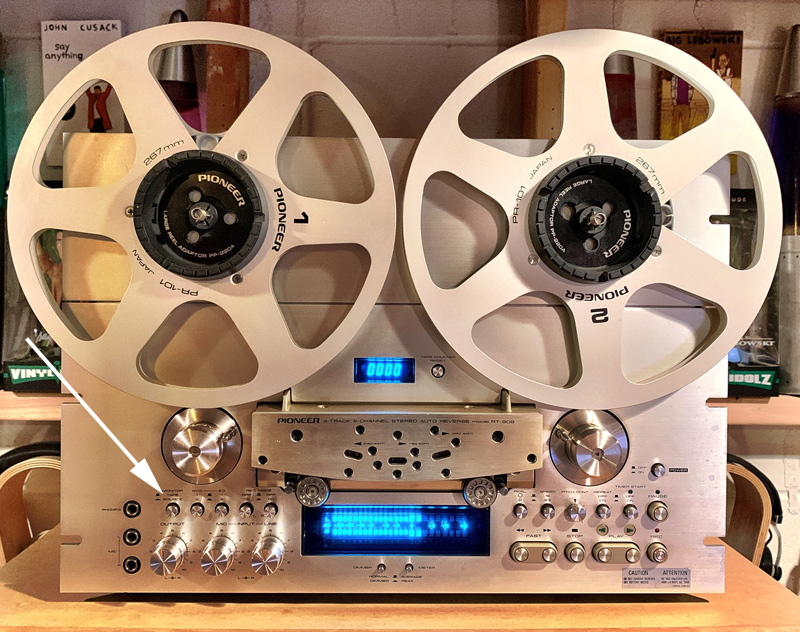
First off, the RT-909 can be on or off, it only matters whether or not you want to see the bouncing meters. If you do, it needs to be on.
The Monitor toggle button has two states: Tape and Source. You need it set to Source if you want to see the meters undulate to the sound emanating from your speakers.
Scenario #2 – Listening to a cassette…
Everything above is the same except:
- On the SA-9800, the Tape Monitor switch needs to be set to: 1
- On the SA-9800, the Tape Duplicate switch needs to be set to: 1>2
- On the CT-F1250, the Monitor button needs to be toggled to: Tape
- On the RT-909, the Monitor button needs to be toggled to: Source
By doing this, all of the sound altering components will be in play, and the meters on the RT-909 will bounce in time with whatever cassette you are rolling on the CF-F1250.
Scenario #3 – Listening to a reel-to-reel tape…
Everything above is the same except:
- On the SA-9800, the Tape Monitor switch needs to be set to: 2
- On the SA-9800, the Tape Duplicate switch needs to be set to: 2>1
- On the RT-909, the Monitor button needs to be toggled to: Tape
- On the CT-F1250, the Monitor button needs to be toggled to: Source
By doing this, all of the sound altering components will be in play, and the meters on the CF-F1250 will bounce in time with whatever cassette you are rolling on the RT-909.
Also, on the RT-909, make sure the Output knob is turned to something other than 0.
Really, that’s all there is to it! Once you have the dozen (or so) switches and knobs dialed in properly, it all lights up like the Eiffel Tower on Christmas Eve…

—
© 2020 – ∞ B. Charles Donley